Electrical Engineering > LAB QUIZ > ECET-105 Week 7 Lab: Flip-Flops and Enhanced Adder-Subtractor (All)
ECET-105 Week 7 Lab: Flip-Flops and Enhanced Adder-Subtractor
Document Content and Description Below
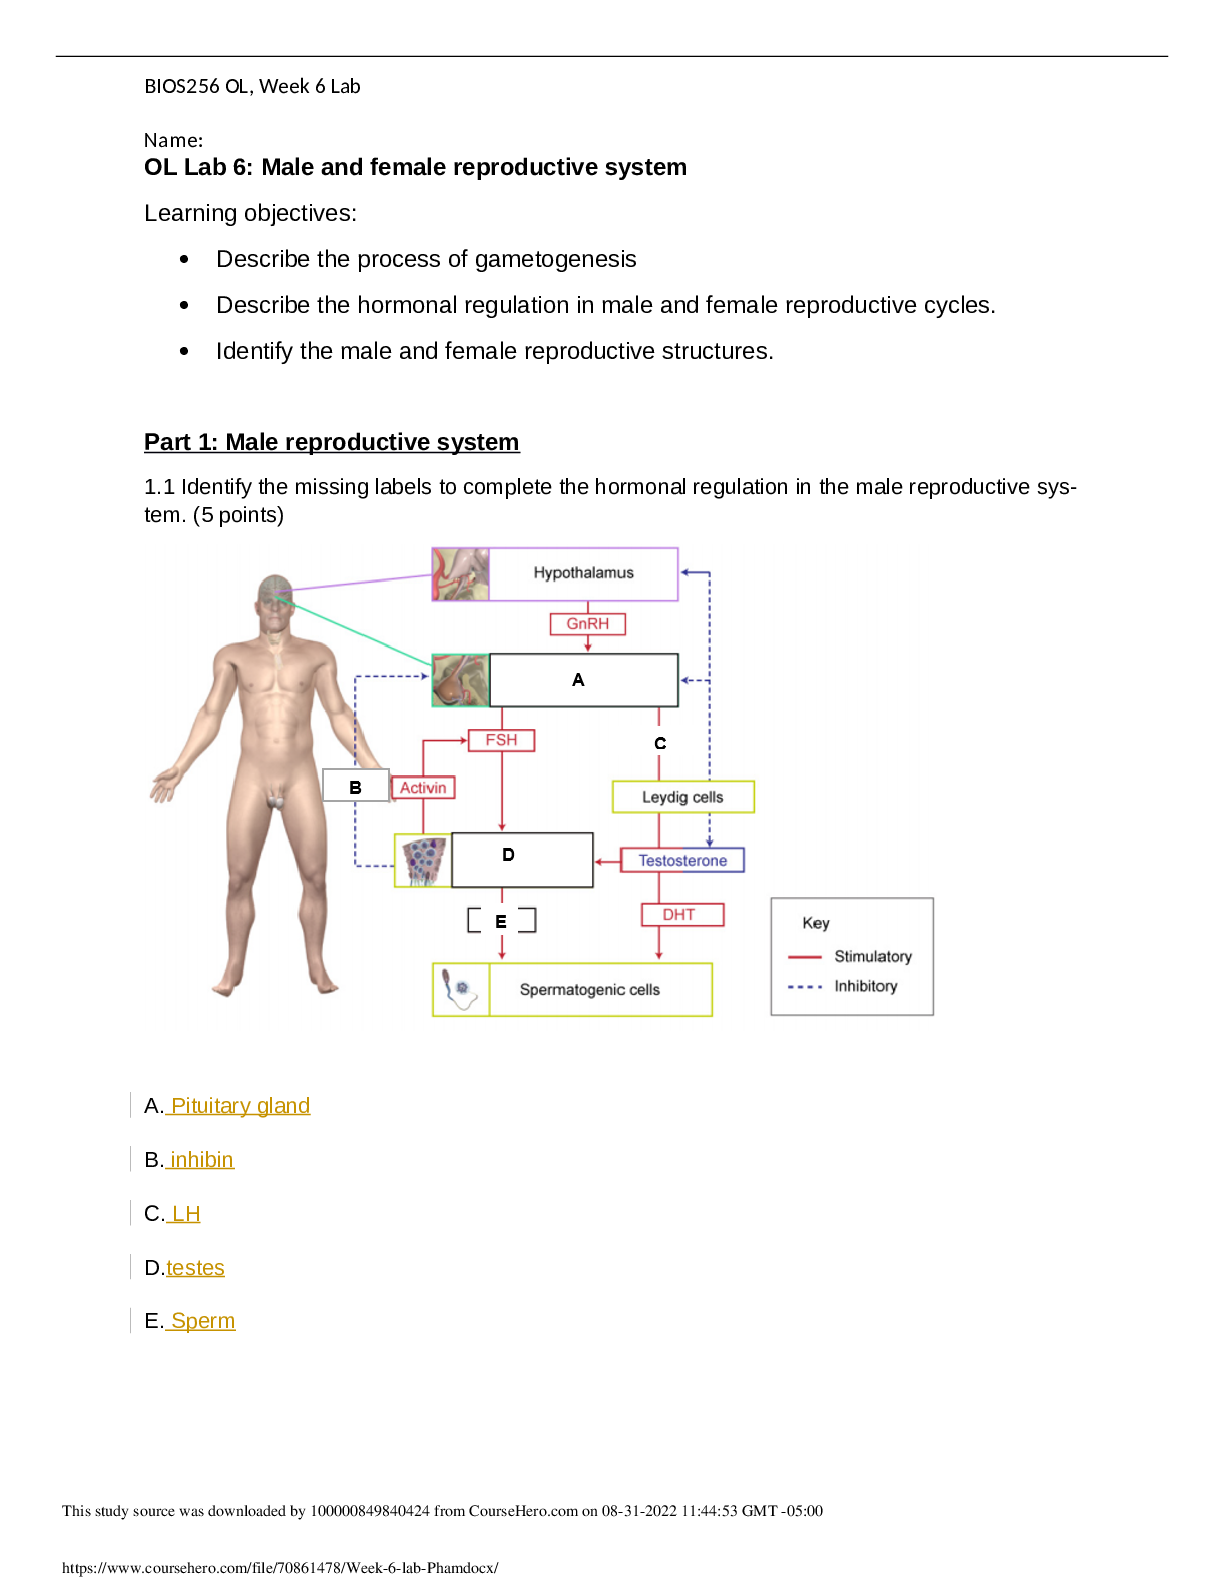
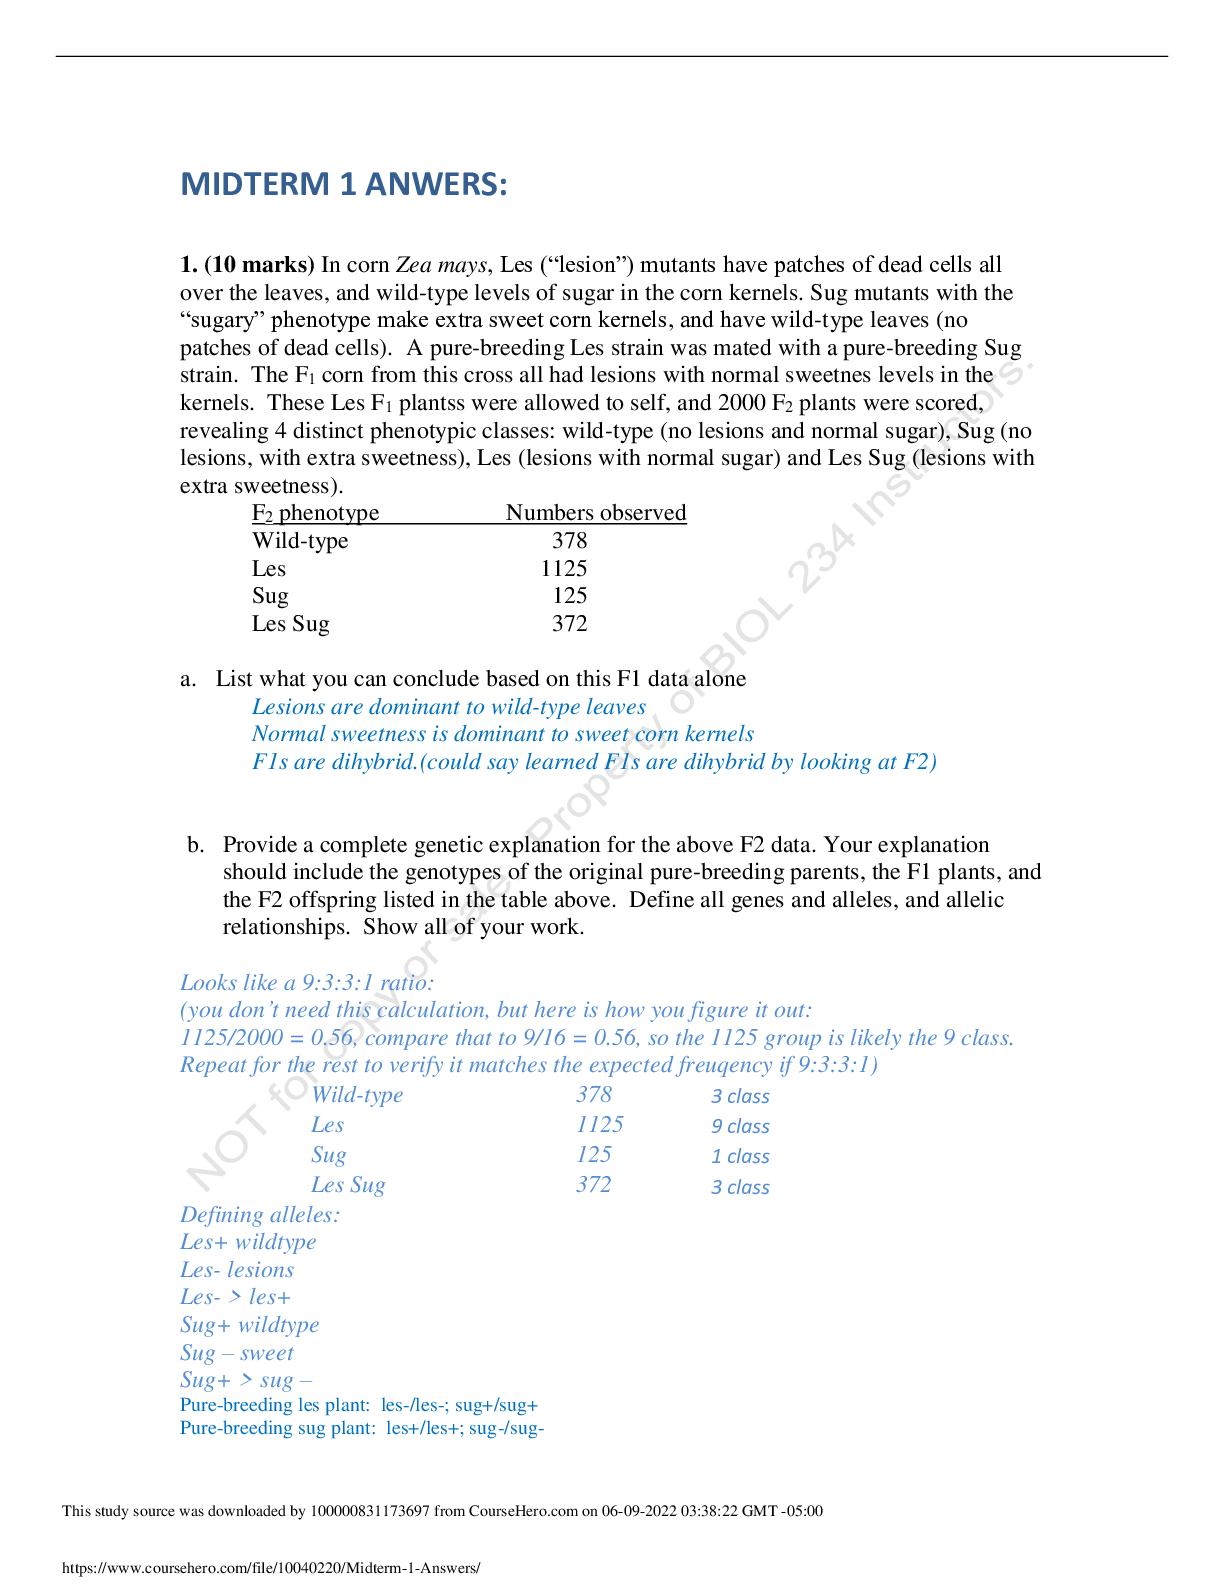
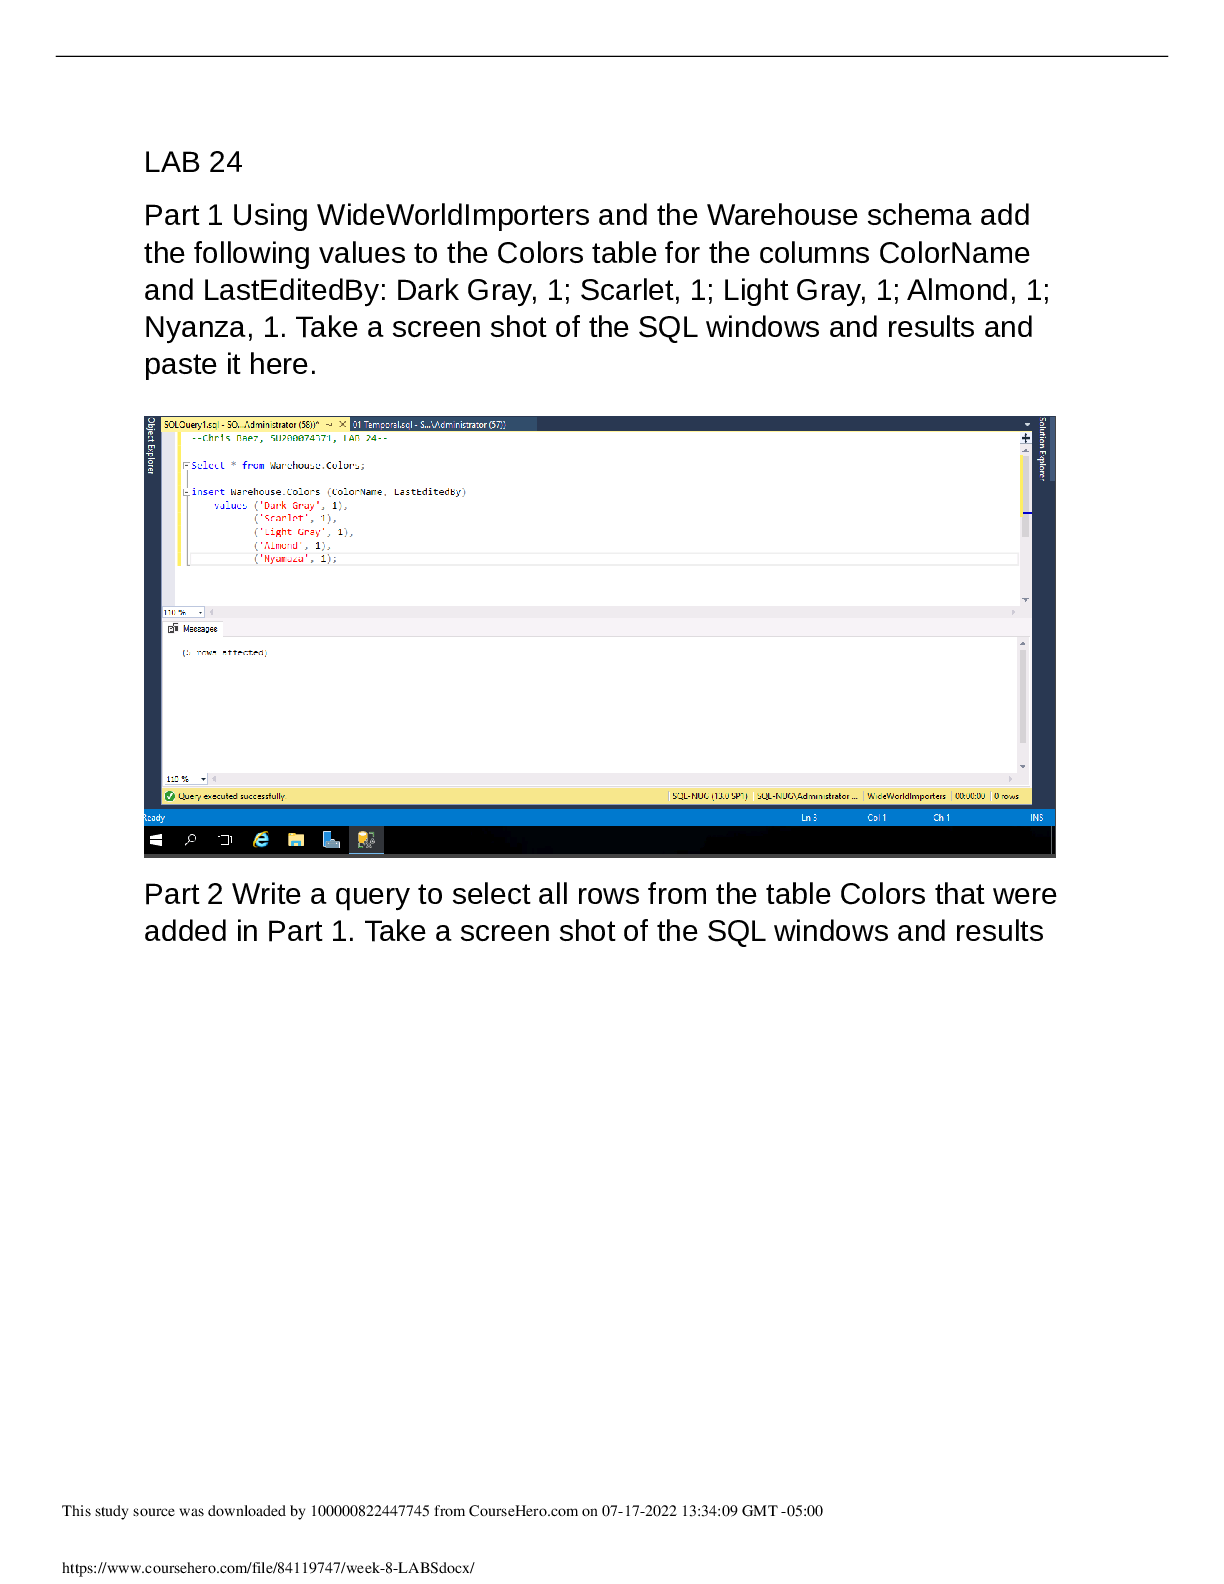
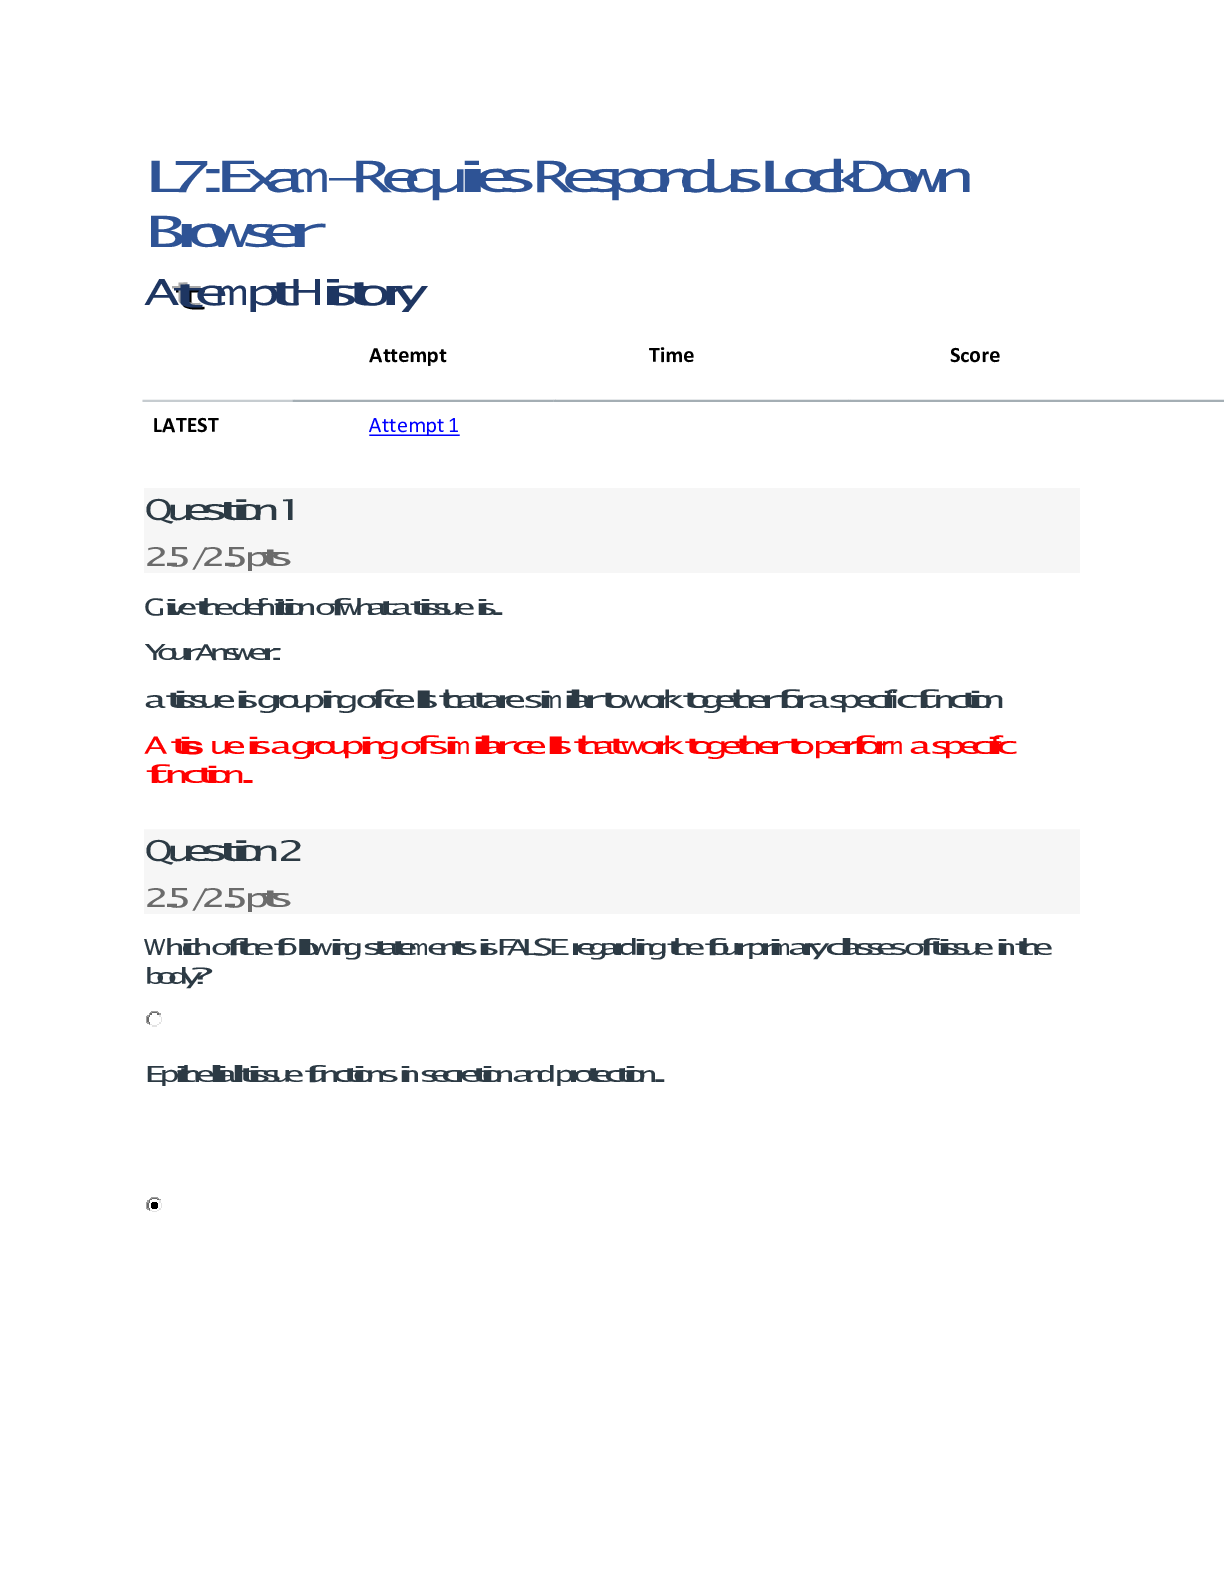
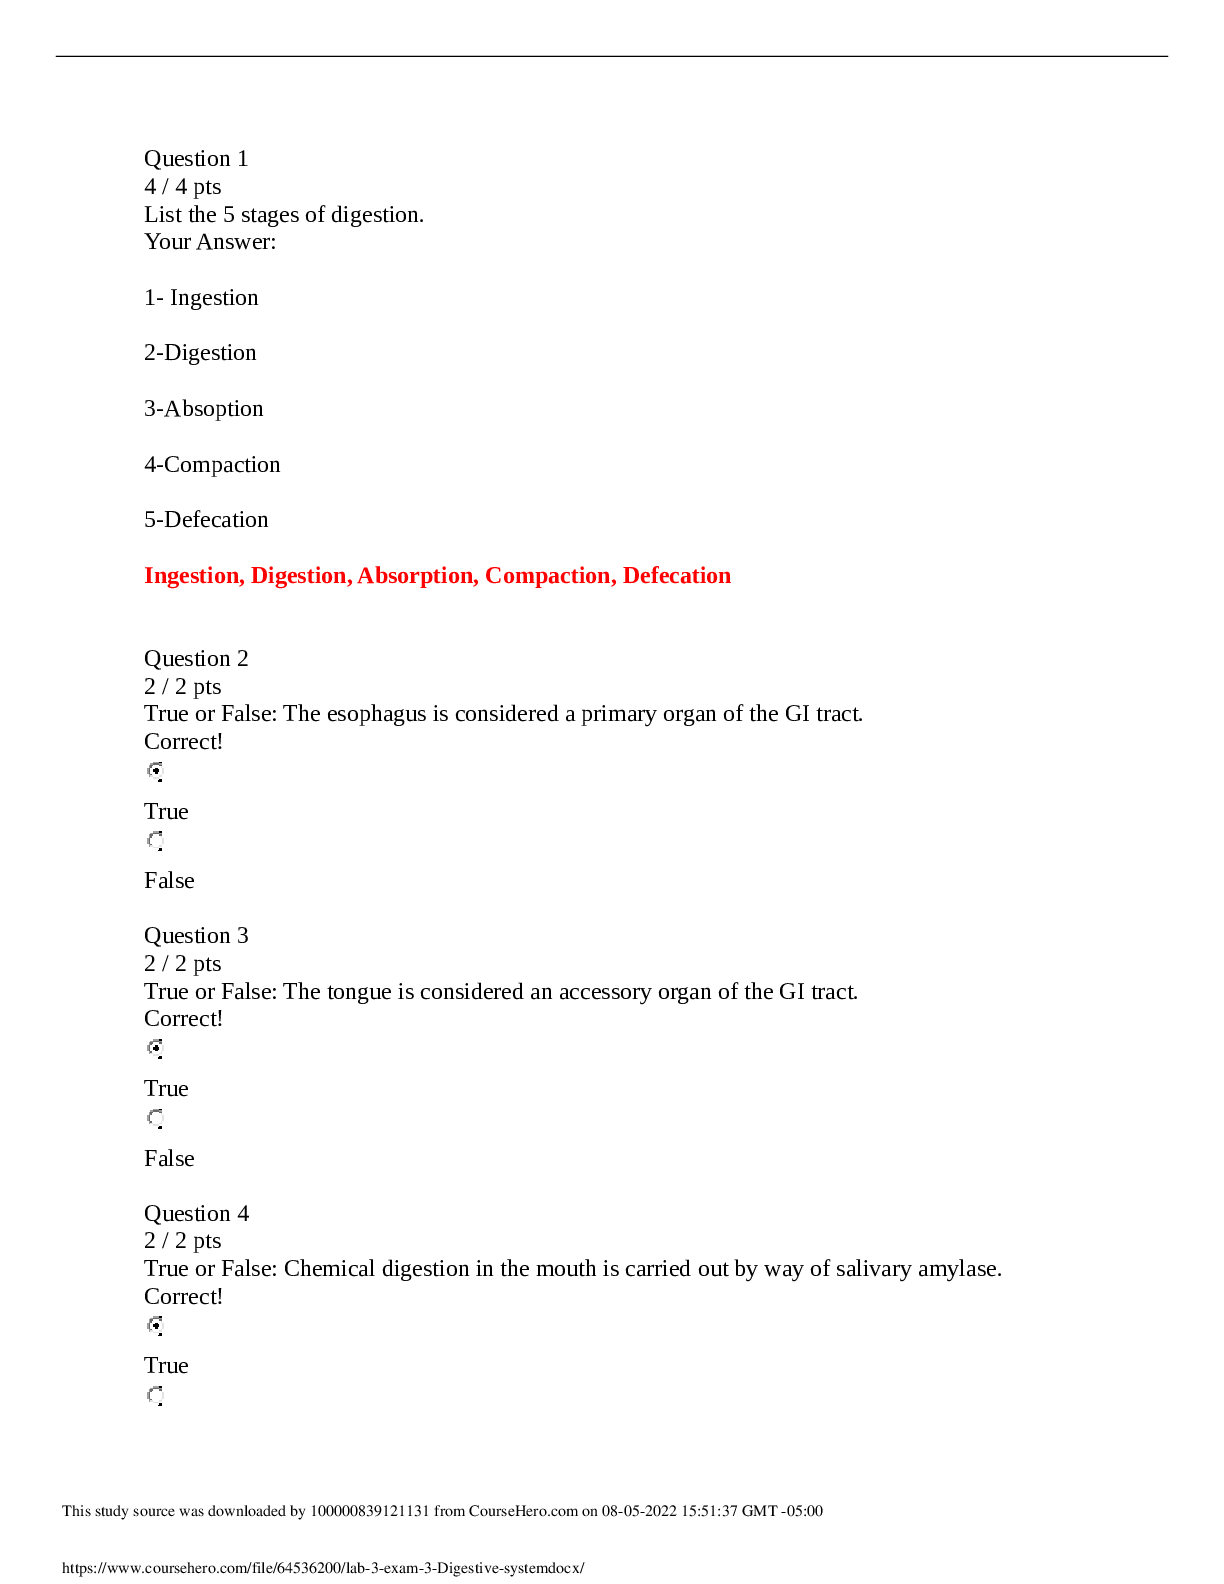
Flip-Flops and Enhanced Adder-Subtractor DeVry University I. Introduction In this lab my lab partner and I investigated flip-flops. This Lab uses D-type and J-K flip-flop circuits to study i... ts operations, measure some key timing parameters, and build an enhanced version of the adder-subtractor circuit. As we began to build the circuits I had difficulties getting the circuit complete without a short. Thanks to the software provided by the school I was able to figure out there was a short in the way I was setting it up. Below you will see the physical circuit built during class along with circuits built on the computer with the same components only digitized. Hope you learn and enjoy the lab report. II. Objective The objective in this lab is to test the operation of a 74LS74 D flip-flop and compare the operation with the predicted behavior. Another objective of this lab is to also test the operation of a 74LSS112 J-K flip-flop and compare to the operation with the predicted behavior as well as measuring the propagation delays of a 74LS112JK flip flop. Finally, to build and test an enhanced adder-subtractor. III. Part List Equipment: IBM PC or Compatible with Windows 2000 or Higher Quartus II Design Software—Version 9.1 Frequency Generator Oscilloscope Parts: 2 – 330 Ω resistors, ¼ W 2 – Red LEDs 1 – 74LS74 dual D flip-flop 1 – Green LED 1 – 74LS112 dual J-K flip-flop 1 – SPDT Switch, DIP configuration 1 – eSOC III FPGA Board IV. Results In result in the lab I was able to accomplish a properly built circuit for the provided question in the lab procedure. I was also able to successfully build it using the Quartus II and MultiSim application. I was also able to get a better understanding of how a D flip- flop and J-K flip-flop function while experiencing it in real time. V. Conclusion In conclusion I was able to successfully complete the lab assignment. I was also able to successfully use the logic chips successfully with all the equipment provided. This lab has taught me that circuitry is not just wires being together but a who building process that take a good thought process along with patience to create a functional flip flop. IV. Procedure A. Test the 74LS74 D Flip-Flop 1. Build the D flip-flop circuit shown in Figure 7.1. The LEDs are wired as active-LOW since the flip-flop can supply more current in a low state than in a high state. This means that the green LED is on when is HIGH and the red LED indicates Q is HIGH. Q Remember to attach VCC to pin 14 and ground to pin 7. Figure 7.1—74LS74 D Flip-Flop Test Circuit 2. Using the circuit, verify that the operation follows the truth table for this device. The truth table was created below along with the circuits built. TRUTH TABLE CLK D ON QN+1 0 X 0 QN 1 0 0 0 1 1 0 1 1 0 1 0 1 1 1 1 Clk =1 D=0 Q1 = 0 since LED current will flow in green led and it will blink. CLK = 1 D=1 ~Q1=0 there red Led will blink 3. What happens when both and are set low? PRE CLR Clk =1 D=0 CLK = 1 D=1 Will work as normal flip-flop. B. Test the 74LS112 J-K Flip-Flop 1. Build the J-K flip-flop circuit shown in Figure 7.2. Remember to attach VCC to pin 16 and ground to pin 8. Figure 7.2—74LS112 J-K Flip-Flop Test Circuit 2. Using the circuit, verify that the operation follows the truth table for this device. CLK J K QN+1 0 X X QN 1 0 0 QN 1 0 1 0 1 1 0 1 1 1 1 1/QN LED will blink when output is zero CLK = 1 J=0 K=0 Qn=0 (initial value) CLK = 1 J=0 K=0 Qn=1 (initial value) CLK = 1 J=0 K=1 CLK = 1 J=1 K=0 3. Increase the pulse generator output to 1.0 MHz. Set the switches so that all of the flip- flop inputs are high and remove the LEDs and resistors. Using the oscilloscope, measure the propagation times for the Q output from the active clock edge. Record the value below. tPHL = 199.49 µs tPLH = 198.98µs C. Enhanced Adder-Subtractor 1. The adder-subtractor circuit built in Lab 5 has a fundamental weakness. Whenever any of the inputs is changed, the output changes. This would present a significant problem in building a calculator since the user only wants the selected operation to occur when the equal button is pressed. We can modify the circuit from Lab 5 to operate in this way by adding in flip-flops to store the outputs only on the activation of a clock signal. 2. Using Quartus II, modify the circuit from Lab 5 as shown in Figure 7.3 by adding three 7474 D-flip-flip chips. Note that a clear function has been added and that the flip-flop presets are inactive since they are tied to +5V (labeled VCC). Figure 7.3—Enhanced Adder-Subtractor 3. Perform a simulation to verify the correct operation of the circuit. Note that in this case, the CLOCK signal is not a periodic signal; the CLOCK signal is a discrete signal occurring on a switch closure. 4. Assign pins to the inputs and outputs. Use the DIP switches for your inputs (0-3 for A, 8- 11 for B, 7 for CLEAR, 15 for ADDSUB), one of the debounced pushbuttons for CLOCK and the red LEDs for outputs (RD0-4). 5. Download you program to the eSOC III board and test the operation of the circuit. 6. Photograph your final circuit for submission (online) or demonstrate your circuit to your professor (onsite or blended). IV. Questions: 1. Why is the condition when both and are LOW considered illegal? PRE CLR At J=1 and K=1 then Q1= 1 (always) 2. How do the values you measured for tPHL and tPLH compare with values specified in the 74LS112 data sheet? You may need to go online to find this value. These values are measured by using oscilloscope. The data value are as follow tPLH: 28ns tPLH: 24ns 3. Why were the LEDs removed before making the propagation delay measurements? Because LED has its own propagation delay if we don’t remove LED it will add up with propagation delay of flip-flop. [Show More]
Last updated: 1 year ago
Preview 1 out of 14 pages
 (1).png)

Reviews( 0 )
Document information
Connected school, study & course
About the document
Uploaded On
May 23, 2022
Number of pages
14
Written in

Additional information
This document has been written for:
Uploaded
May 23, 2022
Downloads
0
Views
66
.png)


.png)

.png)
.png)

.png)